
Building a golf simulator doesn’t have to cost $10,000. With the right component choices and a willingness to do some of the work yourself, you can put together a fully functional home simulator for under $1,000, one that tracks real ball data, plays virtual courses, and fits in a garage or basement. This guide covers everything: what you need, what to build vs buy, a complete parts list, and exactly where to spend and where to save. This specific guide will walk you through how I fit this into a 2 car garage setup. It is semi portable, so I can move it to one side and still park a car in the garage when the simulator is not in use. I reused things like an older unused projector from when the kids were little, and hand-build the return ramps you’ll see in the pictures out of plywood.
The 5 components every golf simulator needs
Every golf simulator, from an $800 DIY home setup to a $50,000 commercial installation, is built from the same five core components. Understanding each one helps you make smart trade-offs when working with a tight budget.
First you need to understand your available space, how much over head space do you have? Enough to swing properly? Enough depth to accommodate the launch monitor requirements? Are you left or right handed? Do you have friends who are left or right handed golfers?
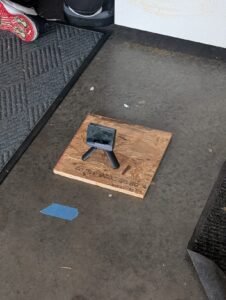
1. Launch monitor: The brain of the setup. It tracks your ball and club data and sends it to the simulation software. This is where you should spend the most money in a budget build, because a bad launch monitor ruins the experience. In our setup we use the Garmin R10. Typical cost $400-$500. One of the most important factors is depth with the R10, as you will need at least 16 feet of depth for it to accurately track your shots. This our choice due to space, and the fact that I’m left-handed and all of my golf buddies are right handed. As the R10 sits behind you, instead of to either side, there is no moving of the launch monitor to contend with.
2. Hitting mat: What you stand on and swing from. Budget options exist that are perfectly adequate. We use bltend golf mat for our hitting mat. You don’t want to buy the cheapest option here, spend the money on a durable and heavy mat. The surface can wear out prematurely, and if the mat is too light it will shift potentially causing an opportunity for injury.
3. Impact screen and hitting net: What the ball hits. A hitting net is the budget-friendly choice; an impact screen paired with a projector gives you the full visual experience but costs more. We use this aikee screen for our impact screen, and this ORIENGEAR 10’x10’x10′ for our net. Highly recommend a net to reduce any damage to your surrounding from errant shots or mishits.
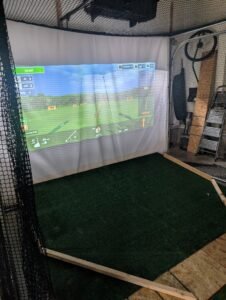
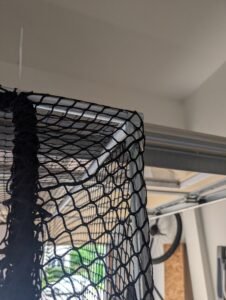
4. Frame or enclosure: Holds the net and screen in place and protects your walls. We use EMT conduit and MakerPipe to construct our enclosure. From experience, do NOT use PVC. A simple 10 foot wide by 7 foot high by 5 foot depth box. We used 8 – 10 foot 3/4 inch EMT conduit and 8 MakerPipe corner connectors. A simple tool for cutting EMT without power tools is available here, since this is a small build, it would not warrant purchasing a power tool. If you have one readily available, no sense in buying the tool.
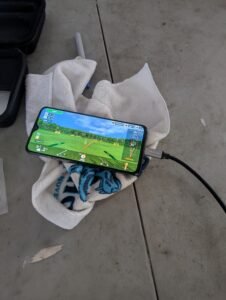
5. Simulation hardware & software: The app or program that displays virtual courses and processes your shot data. Several good options have free tiers; others are one-time purchases that pay for themselves quickly. Phone, table, PC, and/or a monitor or projector depending on your setup.
The launch monitor: spend here, save elsewhere
In a budget build, the launch monitor is the one component where cutting corners costs you the most. A cheap or inaccurate monitor can give you bad data distances that don’t match real life, spin numbers that are made up, and a simulator experience that doesn’t help your game at all.
For a sub-$1,000 build, the Garmin Approach R10 is the clear pick. At $399.99, it’s the most capable radar-based launch monitor at its price point, measuring ball speed, launch angle, spin rate, club head speed, smash factor, and carry distance. It works indoors and outdoors, connects via Bluetooth to the Garmin Golf app, and integrates with GSPro, Awesome Golf, and E6 Connect for full course simulation.
The R10’s radar-based tracking means it doesn’t need special lighting or camera positioning, you place it 6–8 feet behind the ball at ground level, connect your phone, tablet, or PC via Bluetooth, and start hitting. Setup takes under 2 minutes once you’ve done it once. No moving the monitor if you’ve got left and right-handed golfers to accomodate.
Hitting net and impact screen: which are right for your budget?
This is the most important decision in a sub-$1,000 build. Here’s the honest trade-off:
Hitting net (~$100–$200): The ball hits the net and falls to the floor. You see your shot data on your phone or a nearby screen. No projector needed. The Rukket Haack Pro Net is a popular choice at around $160 — it’s durable, sets up in minutes, and fits in a standard garage bay. The downside: you’re staring at a net while you play, not a virtual course on a screen in front of you. For data-driven practice this is fine; for the full simulator experience, it falls short.
Impact screen + projector (~$300–$600 for the screen, $400–$900 for a short-throw projector): The ball hits a specially reinforced screen and bounces back safely while a projector beams the virtual course onto the screen from a short distance. This is the full experience — you’re visually playing courses, not staring at a net. The problem at a strict $1,000 budget is that a decent screen and short-throw projector alone eat most of your budget before you’ve bought a launch monitor or mat.
Our recommendation for under $1,000: Start with a hitting net. Buy the R10, a good mat, and a net — get your practice system dialed in. Then upgrade to an impact screen and projector when you’re ready to invest another $800–$1,200. This phased approach gets you hitting with real data faster and avoids buying cheap gear you’ll want to replace anyway.
Building a DIY frame: Forget PVC, use EMT Conduit
I first tried PVC, and it was too flexible for this type of setup. Learn from my mistake, save your money and go with EMT conduit. Easily sourced from your favorite big-box store, along with a pipe cutting tool. To connect I used 90 degree Maker Pipe Connectors, source 8 of those.
EMT conduit pipe frame: Purchase eight 3/4 inch 10-foot runs of EMT conduit. Approximately $13 each.
Basic EMT frame materials for a 10′ × 8′ net and impact screen:
• Four uprights: height (up to 10 feet) cut for your dimensions
• Top horizontal: two standard 10 foot EMT, no cutting
• Bottom horizontal: two standard 10 foot EMT, again no cutting
• 8 Maker Pipe 90 degree connectors
• Optional – Pipe Insulation for 3/4 inch pipe
• Optional – Tarp to darken the top and back of the screen for better picture quality
• Total cost: $104 EMT, $48 Maker Pipe 90 degree connectors, $22 EMT Pipe Cutter – total ~$175
This design allows you to incrementally add to the setup, you can start with the frame and net, and then later add on the impact screen. I will add a tarp as I build mine out, as my garage door has windows letting in light. This allows for using the simulator during the day and night, and will improve the overall experience.
Choosing a hitting mat
Your hitting mat takes a beating, thousands of swings, iron divots, and constant foot traffic. Skimping here leads to joint pain and a mat that falls apart within a year.
The mat I use has taken the thousands of shots I’ve made on this simulator over the course of about 6 months. The BltendGolf Mat on Amazon is a good choice that from our experience can serve your needs very well.
Spend a little more and you may have a little better experience, the Fiberbuilt Flight Deck mat ($149.99) is a well-regarded entry-level option that accepts a real tee and has a grass-like surface that won’t punish mis-hits. For a step up, the Country Club Elite by Real Feel Golf Mats ($479 for the 4’×5′ simulator size) is the standard recommendation among serious home sim builders — it has a true grass-like feel, holds up to iron shots without bouncing back, and comes in simulator-ready dimensions.
For a sub-$1,000 build, either the BltendGolf Mat or the Fiberbuilt is the right call — save the premium mat upgrade for when you expand the setup.
Simulation software: what you actually need
The R10 comes with access to the Garmin Golf app, which has a free tier covering basic ball data and a driving range mode. For actual course play, the Garmin Golf Premium subscription runs $99.99/year and unlocks 42,000+ virtual courses through the Approach Golf platform.
If you want better graphics and more realistic course simulation — and eventually plan to add an impact screen — GSPro is the recommended third-party option. It’s a one-time purchase of $250 for a lifetime license and offers significantly better visuals than the Garmin native platform. The R10 connects to GSPro via the GSPro Connect bridge app on a Windows PC.
E6 Connect is another option, available on subscription, with a solid course library and compatibility with the R10. It runs on both PC and iPad, making it flexible if you don’t have a dedicated Windows machine for the sim room.
Complete under-$1,000 DIY build list
Here’s a realistic parts list for a functional DIY golf simulator at the $1,000 ceiling:
Basic Build (no projector, no impact screen):
Garmin Approach R10 launch monitor — $399.99
Bltend Golf hitting mat — $95
ORIENGEAR Golf Net (10’×10′×10′) — $110
EMT conduit frame materials — $175
Garmin Golf Premium subscription (1 year) — $99.99
Miscellaneous (zip ties, rubber floor mat, tees) — $30
An old mobile phone, your phone – Free
HDMI to C cable for phone to projector – $15
A computer monitor with HDMI – $80
Basic Build Total ~$910
Full Build Add-Ons:
aikeec Golf Simulator Impact Screen — $105
Projector – Epson EX3290 – $599
Black out tarp or curtain – $75
PC with high-level GPU – $1,800 (variable depending on software spec – expect to spend $1,000 or more)
Full Build Total: ~$2,690 to $3,490
The natural upgrade path: where to invest next
The beauty of a component-based DIY sim is that nothing is wasted when you upgrade. Here’s the logical sequence after your initial build:
First upgrade (~$800–$1,200 more): Add an impact screen and short-throw projector. The Optoma GT1090HDR is the go-to short-throw projector for golf simulators at ~$1,299, paired with a DIY impact screen frame and Carl’s Place screen material (~$350–$500). At this point you have a visually complete simulator — the R10 data feeds into GSPro and displays on the screen in front of you as you play.
Second upgrade (~$1,600–$2,000 more): Swap the R10 for a SkyTrak+ for more data points, improved spin accuracy, and a more refined indoor tracking experience. Your frame, mat, screen, and software all carry over — you’re just swapping the monitor.
Third upgrade (optional): Replace the DIY frame with a proper golf enclosure from Carl’s Place or Shop Indoor Golf for side baffles, better ball containment, and a more finished look.
Common DIY mistakes to avoid
Buying a cheap launch monitor to save money. Launch Monitors under $200 produce estimated data, not measured data. The experience of hitting shots and seeing meaningless numbers gets old fast. Stretch to the R10, it’s the minimum threshold for real, useful ball-flight data.
Underestimating ceiling height. You need at least 9 feet of clearance at the ball contact point — not just in the middle of the room, but along your full swing arc. A beam, duct, or light fixture at 8.5 feet will get hit.
Buying a regular projector instead of short-throw. A standard throw projector placed 10–15 feet back will have your shadow blocking the image every swing. You need a short-throw projector rated for 1.0 throw ratio or less.
Skipping the side barriers. Golf balls hit at 100+ mph will find any gap in your enclosure. Add side panels or netting returns to catch balls that clip the edge of your hitting area.
Not securing the frame to the floor. Anchor the base with sandbags, floor plates, or L-brackets. A 10-foot-tall frame tipping over mid-swing is dangerous.
Frequently asked questions
Can I build a golf simulator for under $500?
Yes, but with significant compromises. The best $500 setup is a Garmin R10 ($399.99) plus a basic budget net (~$80) with no mat — hit off your existing flooring or a thin rubber mat. You’ll have real data and something to hit into, but the experience is limited. Treat it as a stepping stone to the full build described above.
Do I need a projector for a DIY golf simulator?
No — and for a sub-$1,000 build, you shouldn’t buy one. In a net-based setup, you view shot data and the course on a phone, tablet, or nearby TV. Add the projector and screen as your second upgrade once the core system is working well.
How much space do I need for a DIY golf simulator?
Minimum: 9 feet high × 12 feet wide × 15 feet deep. The ceiling height is non-negotiable. A single car garage bay (typically 10’×20′) is the most common setup space and works well.
Is a DIY golf simulator worth it compared to buying a package?
Almost always yes at this budget level. Pre-built packages under $1,000 tend to cut corners on the launch monitor — the most important component. Building your own lets you put $400 into a Garmin R10 and spend the rest on quality support components. As your budget grows, you upgrade individual pieces rather than replacing everything.
What’s the best hitting net for a DIY golf simulator?
The Rukket Haack Pro Golf Net is the most recommended option at this budget level. It handles full driver shots reliably and sets up without a permanent frame — useful if you’re sharing the space with a car. For a more permanent setup where you’re building your own PVC frame, any heavy-duty netting rated for golf use will work — look for double-layer polyester or high-density polyethylene.
Some links on this page are affiliate links — we earn a small commission if you purchase through them, at no extra cost to you. See our affiliate disclosure for full details.